KitKat Brownies
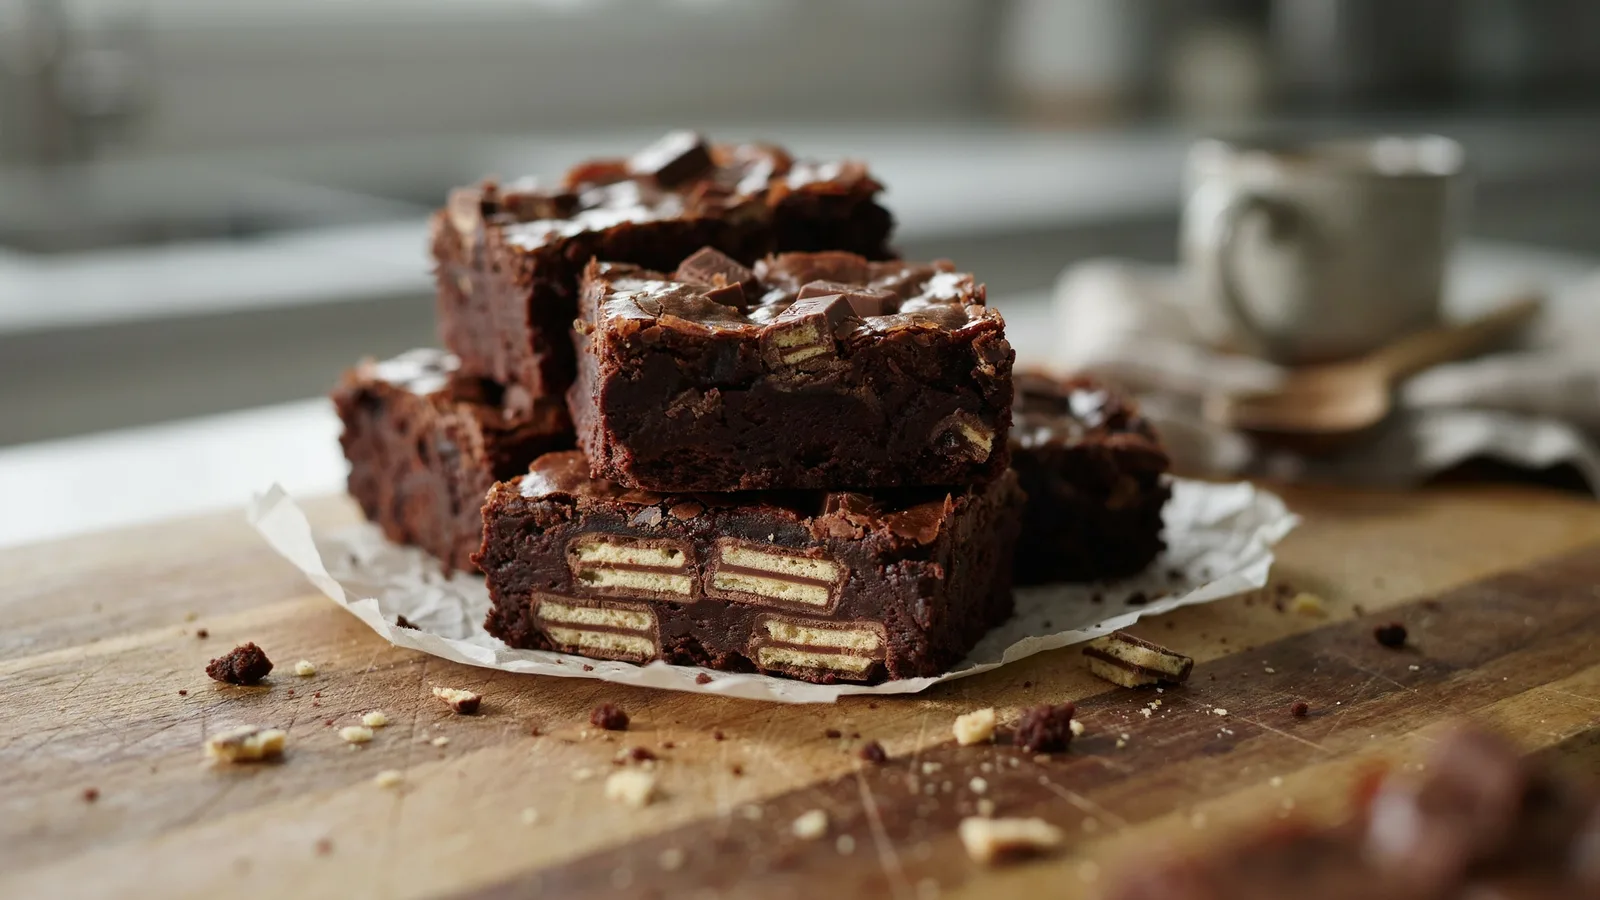
A layer of whole KitKat fingers in the middle of a fudgy brownie gives every square a thin, crisp wafer stripe, and chopped pieces on top make them recognizable at a glance. The candy also makes the usual doneness tests less reliable, so this version tells you exactly where to check.
Ingredients You’ll Need
- 1/2 cup (113 g) unsalted butter, cut into pieces
- 4 oz (113 g) semisweet or bittersweet chocolate, chopped
- 1 cup (200 g) granulated sugar
- 2 large eggs, at room temperature
- 1 tsp vanilla extract
- 1/4 tsp kosher salt
- 1/3 cup (28 g) unsweetened cocoa powder
- 1/2 cup (63 g) all-purpose flour
- 7 standard KitKat bars (1.5 oz / 42 g each), divided
How to make KitKat brownies
- Step 1.
Heat the oven to 350°F (175°C). Line an 8×8-inch metal pan with parchment, leaving an overhang on two sides, and lightly grease the parchment.
- Step 2.
Unwrap the KitKats. Break 5 bars into single fingers for the middle layer. Roughly chop the remaining 2 bars into 3–4 pieces per finger and set aside for the top.
- Step 3.
Melt the butter and chopped chocolate in a heatproof bowl in the microwave in 30-second bursts, stirring between each, until smooth. Whisk in the sugar; the mixture will look slightly grainy.
- Step 4.
Whisk in the eggs one at a time, then the vanilla and salt. Whisk vigorously for about 1 minute, until the batter looks glossy and slightly thicker.
- Step 5.
Sift or whisk in the cocoa powder, then fold in the flour with a spatula just until no dry streaks remain.
- Step 6.
Spread a little more than half of the batter in the pan. Lay the KitKat fingers flat on top in two rows, trimming any that do not fit, and leave a small gap around the edge of the pan.
- Step 7.
Spoon the remaining batter over the KitKats and gently spread it to cover them. It does not need to be perfectly smooth. Scatter the chopped KitKat pieces over the top and press them in lightly.
- Step 8.
Bake for 30–35 minutes, until the edges are set and slightly pulling away from the pan and the center no longer wobbles. A toothpick inserted into brownie between the candy pieces should come out with moist crumbs, not wet batter.
- Step 9.
Cool completely in the pan on a rack, about 2 hours. Lift out with the parchment and cut into 16 squares with a large sharp knife, pressing straight down and wiping the blade between cuts.
Why the KitKats go in whole
Chopped candy stirred through the batter mostly disappears: the milk chocolate coating melts into the brownie and the small wafer pieces soften. Laying whole fingers flat in the center works better. The batter above and below protects the wafer, so each square ends up with a distinct wafer layer running through the middle rather than a few soggy flecks.
The chopped pieces on top are there for a different reason. They stay exposed to the oven’s dry heat, so they keep more crunch and show clearly what kind of brownie this is. Press them in just enough to stick; buried pieces lose that contrast.
A brownie batter that can carry candy
This batter uses melted butter with both chopped chocolate and cocoa, which gives a dense, fudgy crumb with enough structure to hold a layer of candy without collapsing around it. A very cakey batter would rise up and around the KitKats and make them feel buried; a very loose, underbaked-style batter would let the fingers sink to the bottom.
Whisking hard for a minute after the eggs go in is what builds the shiny, crackly top. Once the flour is added, switch to folding. Beating at that stage develops gluten and pushes the texture toward cake.
Make party food easier.
Get practical recipes, useful swaps and seasonal ideas delivered to your inbox.
Laying the middle layer
Spread slightly more than half the batter in the pan so the bottom layer is thick enough to keep the KitKats off the pan’s surface. Standard fingers are about 3 1/2 inches long, so two rows cover most of an 8-inch pan. Trim a few fingers to fill gaps, and keep a narrow border around the edge. Wafers touching the metal tend to overbrown and make the corners hard to cut.
The top layer of batter will feel thin as you spread it. Drop spoonfuls over the candy first, then nudge them together with an offset spatula or the back of a spoon. Small gaps close up as the brownies bake.
Knowing when they are done
This is where candy brownies usually go wrong. The toothpick test is unreliable because melted chocolate from the KitKats coats the pick and looks like raw batter. Test in the brownie between the candy pieces, a little away from the center. You want moist, clinging crumbs, not a shiny, liquid streak.
Also check the pan itself. The edges should look set and pull slightly away from the sides, and the middle should not wobble when you nudge the pan. The top will still feel soft; brownies firm up considerably as they cool. If the center looks wet at 30 minutes, give it 3 to 5 more minutes rather than a long extension. Overbaking dries the brownie, while the wafer layer stays crisp either way.
Cutting clean squares
Let the pan cool completely. Warm brownies with a molten candy layer smear and tear. For sharp edges, refrigerate the cooled slab for about 30 minutes, then cut straight down with a large knife instead of sawing, which drags the wafer layer out of place. Wipe the blade clean between cuts. Serve at room temperature, when the brownie is at its fudgiest.
Variations that still work
Dark chocolate KitKats: use them for the middle, the top or both. The brownie will taste less sweet, which some people prefer with this much candy.
Boxed brownie mix: a mix made for an 8×8 or 9×9 pan can replace the from-scratch batter. Prepare it with the fudgy directions, assemble the same way and check doneness early, since mixes vary.
A 9×13-inch pan: double the batter, use 10 bars in the middle and 4 on top, and start checking at about 30 minutes. The thinner edges will be done sooner than the center.
Storage and bake-sale planning
Store the squares in an airtight container at room temperature for up to 4 days. The top candy pieces gradually soften from the brownie’s moisture, so they are crunchiest on the first and second days. Bake them the day before a party or bake sale, cool, cut and store them with parchment between layers.
To freeze, wrap individual squares well and freeze for up to 2 months. Thaw them wrapped at room temperature so condensation does not form on the chocolate.
KitKat Brownies
Fudgy chocolate brownies with a crisp layer of whole KitKat fingers in the middle and chopped KitKats pressed into the top.
Ingredients
- 1/2 cup (113 g) unsalted butter, cut into pieces
- 4 oz (113 g) semisweet or bittersweet chocolate, chopped
- 1 cup (200 g) granulated sugar
- 2 large eggs, at room temperature
- 1 tsp vanilla extract
- 1/4 tsp kosher salt
- 1/3 cup (28 g) unsweetened cocoa powder
- 1/2 cup (63 g) all-purpose flour
- 7 standard KitKat bars (1.5 oz / 42 g each), divided
Instructions
- Heat the oven to 350°F (175°C). Line an 8×8-inch metal pan with parchment, leaving an overhang on two sides, and lightly grease the parchment.
- Unwrap the KitKats. Break 5 bars into single fingers for the middle layer. Roughly chop the remaining 2 bars into 3–4 pieces per finger and set aside for the top.
- Melt the butter and chopped chocolate in a heatproof bowl in the microwave in 30-second bursts, stirring between each, until smooth. Whisk in the sugar; the mixture will look slightly grainy.
- Whisk in the eggs one at a time, then the vanilla and salt. Whisk vigorously for about 1 minute, until the batter looks glossy and slightly thicker.
- Sift or whisk in the cocoa powder, then fold in the flour with a spatula just until no dry streaks remain.
- Spread a little more than half of the batter in the pan. Lay the KitKat fingers flat on top in two rows, trimming any that do not fit, and leave a small gap around the edge of the pan.
- Spoon the remaining batter over the KitKats and gently spread it to cover them. It does not need to be perfectly smooth. Scatter the chopped KitKat pieces over the top and press them in lightly.
- Bake for 30–35 minutes, until the edges are set and slightly pulling away from the pan and the center no longer wobbles. A toothpick inserted into brownie between the candy pieces should come out with moist crumbs, not wet batter.
- Cool completely in the pan on a rack, about 2 hours. Lift out with the parchment and cut into 16 squares with a large sharp knife, pressing straight down and wiping the blade between cuts.
Check doneness in the brownie itself, between the candy pieces: a toothpick that hits melted KitKat chocolate will look wet even when the batter is baked. For the neatest squares, chill the cooled slab for 30 minutes before cutting, then let the squares return to room temperature before serving.
NoshParty recipes are carefully researched for clarity, practicality and real-kitchen use.
Never wonder what to bring again.
Get practical party recipes, seasonal ideas and crowd favorites delivered straight to your inbox.